

Create Festive Christmas Tree Brownies for Holiday Cheer
The holidays are here again, right? I just love the sparkle.
This year, let’s make some stunning Christmas Tree Brownies. They bring instant smiles.

We keep things simple here at 911Recipes. Remember our grandma’s kitchen?
These treats capture that same joy easily. No fancy pastry skills needed, promise.
I, Alara Kohn, wanted a quick, cute dessert. These fit the bill perfectly.
They are wonderfully fudgy holiday treats for everyone to share.
Why You’ll Love These Christmas Tree Brownies
Why should these be on your holiday baking list? I have a few reasons.
They really are the best easy baking project. You get big flavor fast.
These Christmas Tree Brownies look like you tried hard. You really didn’t!
Here is why I think you will enjoy making them:
- Quick assembly using a mix gets you baking sooner.
- Creates adorable, festive Christmas Tree Brownies perfect for parties.
- Simple decorating instructions suit all skill levels, even beginners.
- Fudgy texture is guaranteed if you follow the cooling steps closely.
They taste just like home, only shaped like a tree.
Essential Equipment for Making Christmas Tree Brownies
You don’t need a professional bakery setup for this. Gathering your gear is fast.
Having the right tools makes cutting shapes much simpler later on.
Let’s look at what you absolutely need for these cute desserts.
It keeps the process smooth and fun, not frustrating.
Tools for Preparing Christmas Tree Brownies
- One box of your preferred brownie mix.
- A standard 9×13 inch baking pan.
- Mixing bowls for the batter.
- A rubber spatula for spreading.
Decorating Tools for Your Christmas Tree Brownies
- A sturdy Christmas tree-shaped cookie cutter.
- Small offset spatula or butter knife for frosting.
- Piping bag or zip-top bag for controlled frosting.
- Tiny spoons for placing sprinkles carefully.
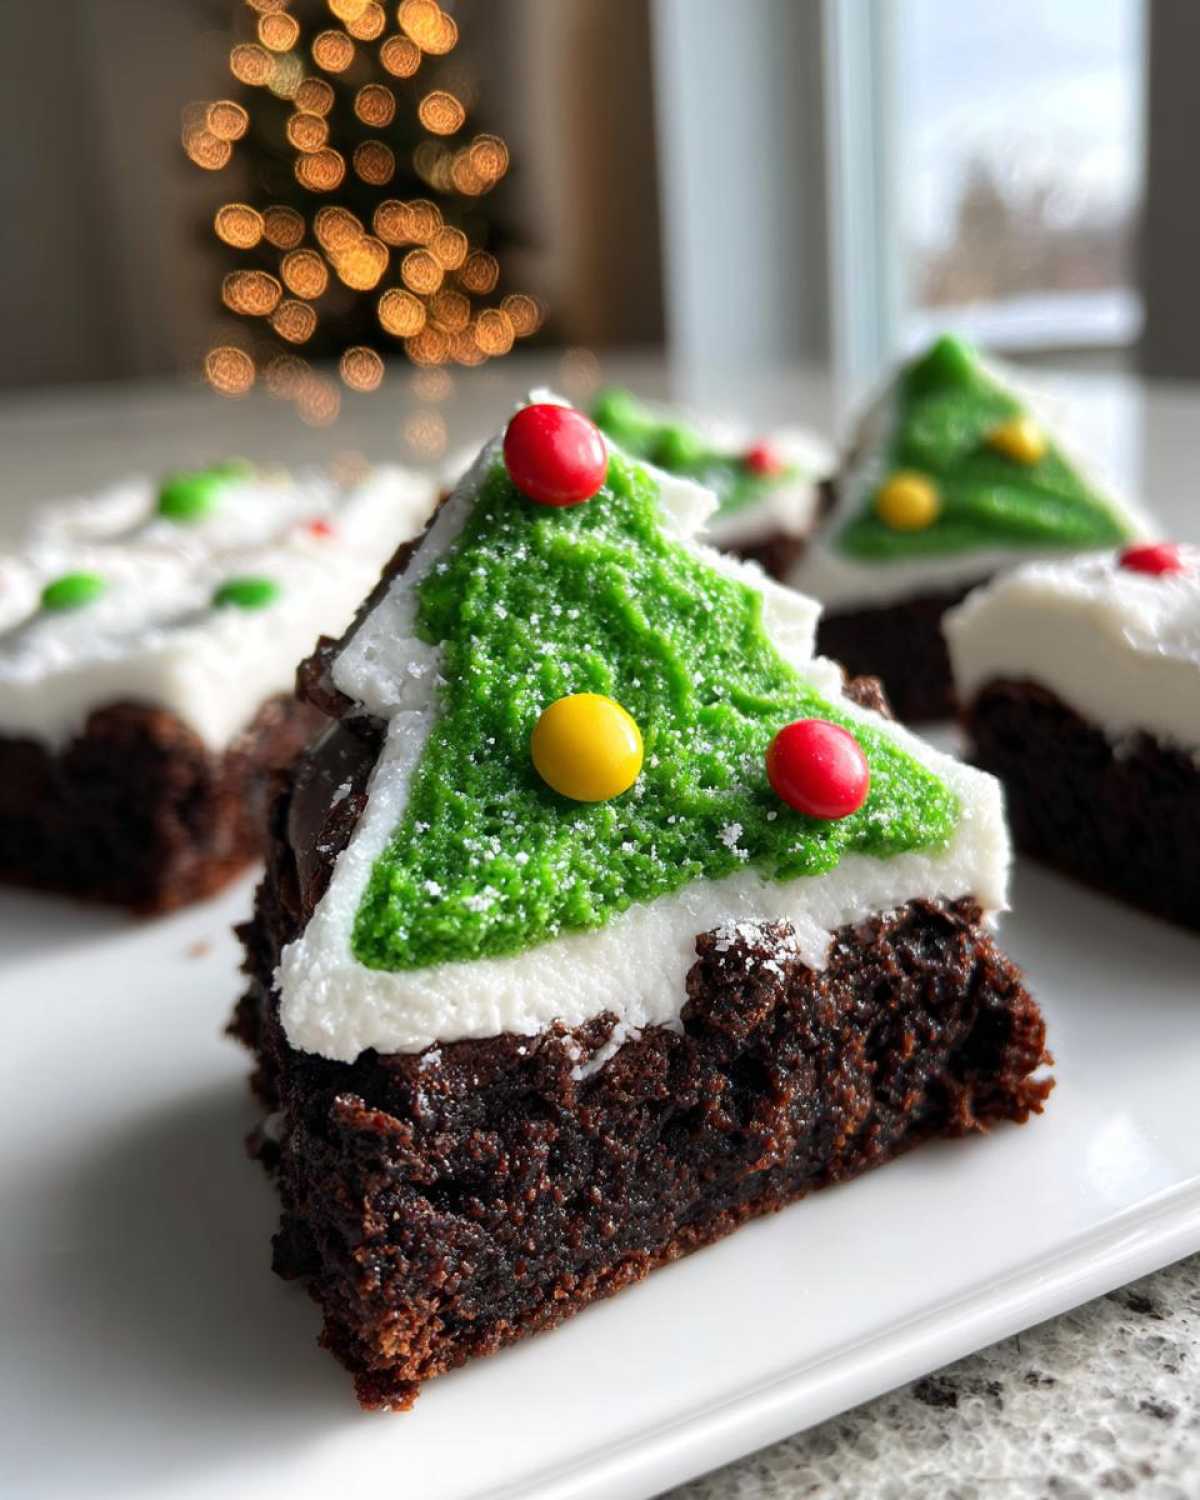
Ingredients for Your Christmas Tree Brownies
Gathering your ingredients is the next easy step. We rely on simple pantry staples.
Using a mix keeps the base prep quick. That leaves more time for fun decorating.
These components create our wonderful Christmas Tree Brownies.
Make sure everything is ready before you start mixing.
It sets up a calm baking session.
Brownie Base Components
- One box of your favorite brownie mix.
- The water, oil, and eggs needed by the mix box.
- Gel or liquid green food coloring. Use enough for a rich color.
Decorating Supplies for Christmas Tree Brownies
- White frosting or a simple powdered sugar glaze.
- Small candies or sprinkles for ornaments. Red and yellow look great.
- Optional: A small piece of plain brownie for the trunk base.
Step-by-Step Instructions for Christmas Tree Brownies
Now for the fun part! Following these steps guarantees amazing Christmas Tree Brownies.
We want them fudgy, not cakey. Pay close attention to the cooling time.
It’s the secret to perfect shapes.
Preparing and Coloring the Brownie Batter
Start by mixing your brownie batter per the box directions.
When it’s just combined, divide the batter evenly.
Put one half into a separate bowl right away.
Add green food coloring to that second bowl.
Mix it in until the green is deep and tree-like.
Keep the other half its original chocolate color.
Baking and Cooling the Green Brownies
Grease and flour your baking pan well first.
Pour only the green batter into the prepared pan.
Spread it out evenly across the bottom surface.
Bake according to your mix’s instructions carefully.
Do not overbake them one bit, okay?
Let the brownies cool completely before touching them.

Cutting and Shaping Your Christmas Tree Brownies
Cooling is crucial for a fudgy texture that holds up.
Once fully cool, grab your tree-shaped cookie cutter.
Press the cutter firmly into the green brownie slab.
Gently lift out each individual tree shape.
If you want a trunk, use a small square of plain brownie.
Place that square right under your tree’s base point.
Decorating the Final Christmas Tree Brownies
Time to make these look festive and bright.
Frost the top of each green tree with white icing.
This looks like fresh snow or pretty garland.
Use a small spoon or knife for light application.
Next, place your tiny candies like ornaments.
Dot them randomly for a cheerful holiday look.
Tips for Perfect Christmas Tree Brownies
Getting these cute desserts right is easy with a few tricks.
My biggest piece of advice for great Christmas Tree Brownies centers on cooling.
Seriously, do not rush this part at all.
If you try cutting warm brownies, they just crumble apart sadly.
I learned that lesson the hard way years ago.
Keep them fudgy by pulling them out just before they seem done.
- Use gel food coloring instead of liquid.
- Gel gives a deeper, truer green color.
- Let the pan sit on a wire rack while cooling down.
- This helps air circulate underneath the pan.
A completely cool brownie cuts like a dream.
Ingredient Notes and Substitution Ideas
Sometimes we run out of things. That is okay!
These festive brownies are forgiving with swaps.
For the base, stick to your favorite brownie mix brand.
It keeps the fudgy results consistent.
If you lack white frosting, a simple glaze works great.
Mix powdered sugar with a tiny bit of milk.
Use yellow or red sprinkles if you don’t have multi-colored ones.
The goal is happy, colorful holiday treats.

Frequently Asked Questions About Christmas Tree Brownies
Got questions about making these cute desserts? I get it!
Baking for the holidays should be fun, not stressful.
Here are answers to common things folks ask me about these Christmas Tree Brownies.
Can I use a different shape cookie cutter?
Absolutely! Feel free to change the shape.
Stars or simple squares work fine for these holiday treats.
Just know that oddly shaped brownies might need careful decorating.
How long do Christmas Tree Brownies stay fresh?
These stay fresh for quite a while.
Stored correctly, they last about four days.
Keep them in an airtight container at room temperature.
How do I get the green color really bright?
For truly bright colors, use gel food coloring.
Gel is much more concentrated than liquid coloring. Gel food coloring is often recommended by bakers for vibrant results.
Add the gel color slowly until you like the shade.
This helps keep the fudgy texture perfect.
Storing and Reheating Your Festive Treats
These little green gems are best eaten fresh.
But we all have leftovers, right?
Keep your decorated brownies looking their best.
Proper storage is key for these cute desserts.
Shelf Life and Container Choice
Store your finished treats in an airtight container.
Keep them at room temperature, not the fridge.
They should stay good for about four days.
Reheating isn’t usually needed for brownies.
They are great straight from the counter.
Share Your Christmas Tree Brownies Creations
I truly hope you loved making these festive brownies.
Seeing your creations makes my day here at 911Recipes.
Did they turn out fudgy and green?
I want to see how you decorated yours!
Rate This Recipe and Connect
Please leave a comment below telling me about your baking.
Did the kids help place the tiny ornaments?
Your feedback helps our whole family kitchen.
Rate this recipe so others can find this joy.
Print
Amazing 3-Step Christmas Tree Brownies Joy
- Total Time: 50 minutes plus cooling time
- Yield: Varies depending on cutter size
- Diet: Vegetarian
Description
Make festive Christmas Tree Brownies for a cute holiday treat. These simple brownies are perfect for sharing holiday cheer.
Ingredients
- 1 box of your favorite brownie mix
- Ingredients required by brownie mix (usually water, oil, eggs)
- Green food coloring
- White frosting or glaze
- Small candies or sprinkles for decoration (red, white, yellow)
Instructions
- Prepare the brownie batter following the package directions, but divide the batter into two bowls.
- Add green food coloring to one bowl until you achieve a rich, tree-like color. Leave the other bowl as is for the tree trunk color, or use a chocolate frosting later.
- Grease and flour a baking pan suitable for cutting out shapes.
- Pour the green batter into the prepared pan, spreading evenly.
- Bake the brownies according to the mix instructions.
- Once baked and cooled completely, use a Christmas tree-shaped cookie cutter to cut out individual brownies.
- Prepare the white frosting or glaze.
- Decorate the top of each brownie tree with the white frosting to resemble snow or garland.
- Place small candies or sprinkles on the green brownies to act as ornaments.
- If you want a trunk, use a small square of plain brownie or a dab of brown frosting at the bottom point of the tree shape.
Notes
- Do not overbake the brownies; they should remain fudgy.
- Allow the brownies to cool completely before cutting; this prevents crumbling.
- Use different shades of green for a varied look.
- Store leftover brownies in an airtight container at room temperature.
- Prep Time: 20 minutes
- Cook Time: 30 minutes
- Category: Dessert
- Method: Baking and Cutting
- Cuisine: American
Nutrition
- Serving Size: 1 brownie
- Calories: Estimate based on mix
- Sugar: Estimate based on mix
- Sodium: Estimate based on mix
- Fat: Estimate based on mix
- Saturated Fat: Estimate based on mix
- Unsaturated Fat: Estimate based on mix
- Trans Fat: Estimate based on mix
- Carbohydrates: Estimate based on mix
- Fiber: Estimate based on mix
- Protein: Estimate based on mix
- Cholesterol: Estimate based on mix

