
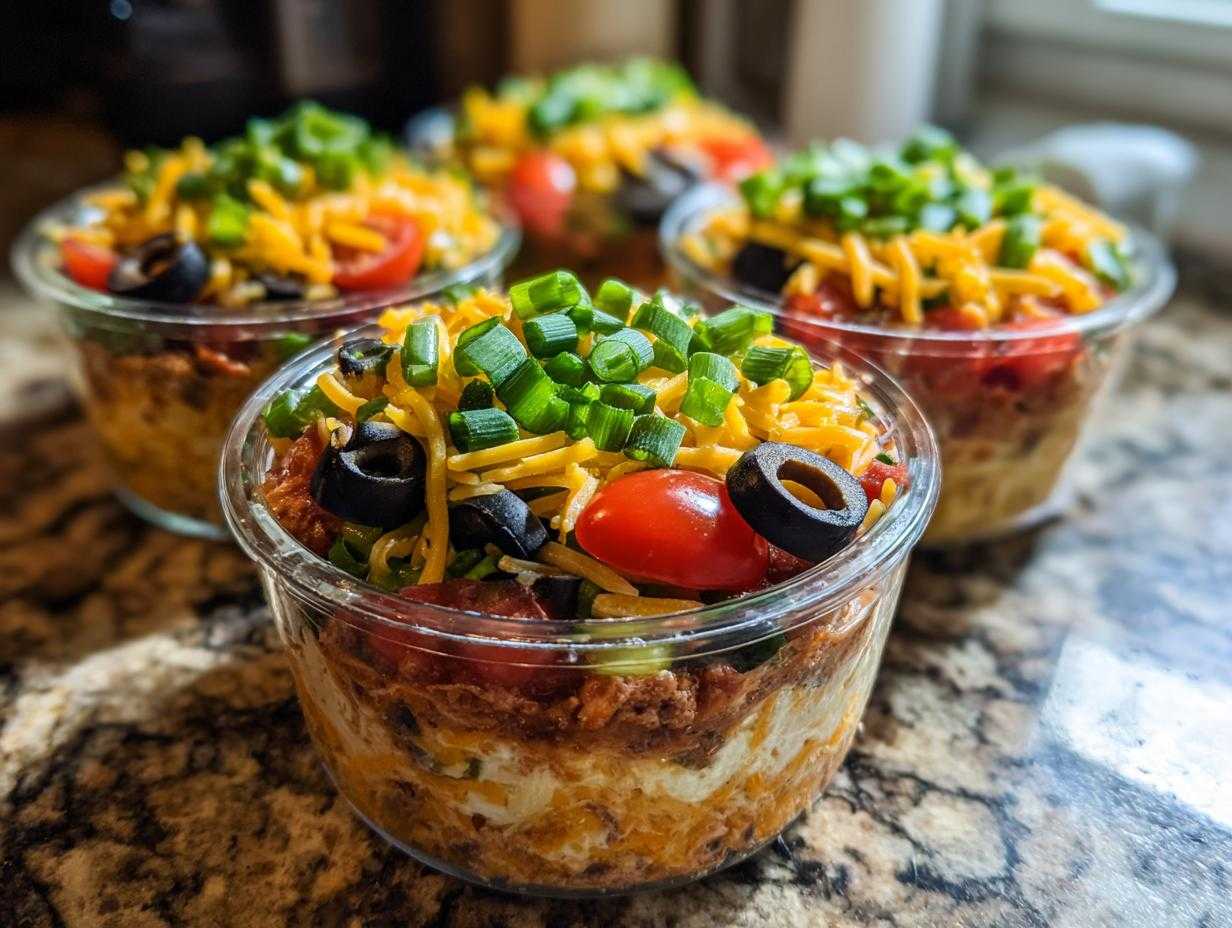
Oh, you know how it is when you’re hosting a big crowd—you make that gorgeous, massive seven-layer dip, and within ten minutes, someone’s already double-dipped or the whole thing has turned into a creamy, cheesy swamp? Ugh, the worst! Seriously, I’ve spent years perfecting my big-batch dip, especially when game day rolls around, but I started thinking there had to be a better way for serving. And guess what? There is!
Enter my absolute obsession: Individual 7-Layer Dip Cups. These little beauties are truly a game-changer for entertaining. We’re talking perfect portion control, zero mess, and you can make them way ahead of time. No fighting over the last chip scoop or worrying about germs! Every single person gets their own perfect tower of flavor, from the spiced beans right up to the green onion garnish. If you love my crowd-favorite 7-layer dip, you’re going to adore this portable version. Trust me, once you try assembling your dip this way, you’ll never go back to the giant platter again. It’s just so satisfying!

Why You Will Love These Individual 7-Layer Dip Cups
It’s all about making your life easier, honey! These cups solve all my party headaches:
- Perfect Portion Control: Everyone gets just the right amount. No waste!
- Super Portable: Easy to grab right off the serving tray, fantastic for picnics or outdoor parties.
- No More Mess: Forget the smeary spoon situation. This is the ultimate no double-dipping snack.
- Gorgeous Presentation: Seeing those seven distinct layers stacked up in clear plastic is just so fun and looks way more professional than a big dish.
Check out my other favorite make-ahead snacks over here: 18 Easy Summer Appetizers Everyone Will Enjoy!
Essential Ingredients for Perfect Individual 7-Layer Dip Cups
The beauty of a classic dip is sticking to the basics that make the layers pop. Since we’re making individual portions, precision matters so those layers don’t sneak into each other before they reach the party! You’ll need seven core components, plus the containers.
- 1 can (15 ounces) refried beans – we’re jazzing these up a bit!
- 1 teaspoon taco seasoning
- 1/2 cup sour cream
- 1/4 cup cream cheese, softened – make sure it’s soft, please!
- 1/4 teaspoon ground cumin
- 1 cup salsa, drained well (and I mean well)
- 1 cup shredded Mexican cheese blend
- 1/2 cup diced tomatoes, seeds removed
- 1/4 cup sliced black olives, drained
- 2 tablespoons chopped green onions
- 7 small clear plastic cups (about 8-10 oz size) – clear is key so you can see the layers!
Ingredient Notes and Substitution Tips
Listen, the biggest enemy of a perfect layered dip is water! Seriously, drain your salsa until you think it can’t drain any more—remove the seeds from the tomatoes too. They introduce too much moisture. For the containers, I found that these 8-ounce sturdy plastic cups or small mason jars work wonders; anything too tiny makes layering a nightmare. If you absolutely must make a guacamole layer, use a firmer, less watery avocado mash and keep that layer sandwiched tightly between dry ingredients!
Assembling Your Layered Dip in Cups Recipe Step-by-Step
Now it’s time for the fun part—building these little towers! We need to work deliberately here to keep everything neat. Remember that quick link for more quick individual appetizer cups if you’re planning a lot of these!
The general rule is to start with the heaviest, least likely to run ingredient at the bottom, and remember: just a light press after each layer. We don’t want to compact everything into one solid wedge!
Preparing the Bean and Creamy Layers
You have to get these base layers right! Take your refried beans and stir in that teaspoon of taco seasoning until it’s perfectly blended and looks like ready-made dip mix. In another bowl, you’re creaming together the softened cream cheese, sour cream, and ground cumin. Beat this until it’s really smooth and lump-free. If your cream cheese is cold, you’ll end up with little white chunks, and we don’t want that texture contrast!
Layering Individual Mexican Dip Cups for Visual Appeal
This is where we build the magic! Start by spooning about two tablespoons of your seasoned bean mixture into the very bottom of each clear cup—gently press it down, just enough to create a stable foundation. Next, we want our smooth cream cheese layer, about a tablespoon per cup. It sits nicely on the beans. Now, spoon in that well-drained salsa, another tablespoon right on top of the cream. After the salsa, sprinkle your shredded cheese, then add a tiny bit of the diced tomatoes, followed by a few black olives. Finish it all off with a cheerful sprinkle of green onions right on top to seal the deal!
Tips for Success with No Mess Layer Dip Cups
The absolute key to keeping these no mess layer dip cups looking fantastic is managing moisture. If you think your salsa is drained enough, drain it one more time! Soggy layers mean blending, and we want distinct stripes of flavor, not a muddy mess.
Here’s my personal secret weapon for making the middle layer look sharp: don’t use a spoon for the sour cream/cream cheese mix. Seriously, load that creamy mixture into a Zip-top bag, snip a tiny corner off with scissors, and pipe it in. It creates a perfectly straight, neat layer every time, and it saves you scraping gunk off a spoon. It feels a little extra, I know, but wow, does it look professional!
Also, remember to chill time! You need those layers to set up a bit before the party starts. Even thirty minutes in the fridge makes a huge difference in keeping everything separated until serving time. They look great, stack easily, and everyone stays happy!
Make Ahead Layer Dip Cups and Storage
These are absolutely the best for party prep because you can get them done before the chaos starts! You can assemble your make ahead layer dip cups up to four hours before you need to serve them, no problem whatsoever. Any longer than that, and you risk the bean layer leaching moisture up into the creamy layer, and we don’t want that structural breakdown.
Once they are all layered beautifully, cover each cup individually with plastic wrap—make sure that wrap actually touches the top garnish layer gently so no air gets in right there. Then stack them up in your fridge. When you pull them out to serve, let them sit on the counter for about five or ten minutes while your guests arrive. They chill up so nicely and are ready to grab!
Variations for Your Portion Controlled Dip Appetizers
The real fun with these Individual 7-Layer Dip Cups is that while the basic structure is solid, you can totally customize it based on what people like or what you have on hand! Since we are already dealing with vegetarian bases, dietary swaps are super easy here. Think of the seven layers as just suggestions, honest!
If the refried beans aren’t your jam, try swapping them out for a layer of seasoned, mashed black beans instead. That works beautifully as the base layer and gives a deeper color. Or, if you want a bit more zing in the middle, you can swap out half of that sour cream mixture for plain Greek yogurt. It’s tangier and a little lighter, which tastes great when balanced by the salty cheese.
For a real showstopper, though, try slipping a layer of fresh, homemade guacamole right above the bean layer. You have to use really firm avocado for that! You can find some great avocado tips over here for the best results when making layer dip in cups recipe variations. Just remember if you add guac, you want to serve these cups a bit sooner, as that avocado doesn’t love hanging out plain!
Serving Suggestions for Portable 7 Layer Dip Idea
Okay, the dip is built, chilled, and looking perfect! But what are you going to eat it with? Since these are individual servings, you need things that are sturdy enough to handle a good scoop without snapping off inside the cup—we don’t want debris in the layers!
Obviously, sturdy tortilla chips are the number one choice. Go for the thick, restaurant-style ones! They handle the weight of all seven layers beautifully. I also love setting out some sturdy raw veggies like carrot sticks and celery for anyone looking to keep things a little lighter. And honestly? Even sturdy pita chips work surprisingly well if you’re serving these at a slightly more elegant gathering. If you want to take your snack game up a notch, maybe try making a batch of my spicy pineapple jalapeno salsa to serve *on the side* as a topping!
Frequently Asked Questions About Individual 7-Layer Dip Cups
I know you’ll have questions once you start assembling these little guys, because everyone wants to make sure their Grab and Go Seven Layer Dip looks just as good as mine! Honestly, most questions boil down to keeping the layers neat and making them ahead of time.
Can I substitute refried beans in these Individual 7-Layer Dip Cups?
You totally can! If you don’t have refried beans handy, or you just want a different flavor, just make sure whatever you use is thick. Seasoned black beans mashed well work great for the base layer. Just like with the beans, that base layer needs to be firm so it can support the next layer of cream cheese goodness. You can check out some more ideas for mini 7 layer dip jars over here!
What is the best container size for Single Serving 7 Layer Dip?
I strongly recommend using those 8 to 10-ounce clear plastic cups, like I mentioned in the recipe. If you try to go much smaller, you honestly won’t have enough surface area to make seven distinct layers that you can see. We want those nice stripes! Smaller cups just turn into a pile of dip way too fast, and where’s the fun in that when you’re making Portion Controlled Dip Appetizers?
Another point for the slightly larger cups is that they make it much easier to dip without knocking over the sides! If you want to see how others have presented these, check out my post on no mess layer dip cups for inspiration.
Nutritional Estimate for Grab and Go Seven Layer Dip
I know some of you watching your macros and calories might wonder what’s in these perfect little portions. Since we’re talking about Grab and Go Seven Layer Dip, it’s nice to know what you’re handing out! Here is the general breakdown for one 10-ounce cup, based on the ingredients list:
- Serving Size: 1 cup
- Calories: 180
- Fat: 12g
- Saturated Fat: 6g
- Carbohydrates: 12g
- Fiber: 3g
- Protein: 7g
- Sodium: 450mg
Now, keep in mind, this is just an estimate, sweetie! The sodium content can swing wildly based on the brand of refried beans or the saltiness of your salsa. If you use light sour cream or lower-sodium seasoning blends, these numbers will change. But generally, they clock in at a perfectly reasonable appetizer level!
Print
Individual 7-Layer Dip Cups
- Total Time: 20 min
- Yield: 7 servings
- Diet: Vegetarian
Description
Make portable, single-serving portions of classic 7-layer dip in individual cups for easy serving and portion control at gatherings.
Ingredients
- 1 can (15 ounces) refried beans
- 1 teaspoon taco seasoning
- 1/2 cup sour cream
- 1/4 cup cream cheese, softened
- 1/4 teaspoon ground cumin
- 1 cup salsa, drained well
- 1 cup shredded Mexican cheese blend
- 1/2 cup diced tomatoes, seeds removed
- 1/4 cup sliced black olives, drained
- 2 tablespoons chopped green onions
- 7 small clear plastic cups (about 8-10 oz size)
Instructions
- In a small bowl, mix the refried beans with taco seasoning until combined.
- In a separate bowl, beat the sour cream, softened cream cheese, and cumin until smooth. This is your creamy layer.
- Drain the salsa thoroughly to prevent the dip from becoming watery.
- Begin assembling the dips in the individual cups. Place about 2 tablespoons of the seasoned refried beans into the bottom of each cup. Press down lightly.
- Spread about 1 tablespoon of the sour cream/cream cheese mixture over the bean layer in each cup.
- Spoon about 1 tablespoon of the drained salsa over the creamy layer.
- Sprinkle a layer of shredded cheese over the salsa in each cup.
- Top the cheese with a small amount of diced tomatoes.
- Add a few slices of black olives to each cup.
- Garnish the top of each dip cup with chopped green onions.
- Chill the cups for at least 30 minutes before serving to allow the layers to set.
Notes
- Drain all wet ingredients, like salsa and olives, very well to keep the layers distinct.
- To keep layers separate longer, assemble the dips no more than 4 hours ahead of time.
- Use small jars or sturdy plastic cups for the best presentation and portability.
- Prep Time: 20 min
- Cook Time: 0 min
- Category: Appetizer
- Method: Layering
- Cuisine: Mexican-inspired
Nutrition
- Serving Size: 1 cup
- Calories: 180
- Sugar: 4
- Sodium: 450
- Fat: 12
- Saturated Fat: 6
- Unsaturated Fat: 6
- Trans Fat: 0
- Carbohydrates: 12
- Fiber: 3
- Protein: 7
- Cholesterol: 25

