
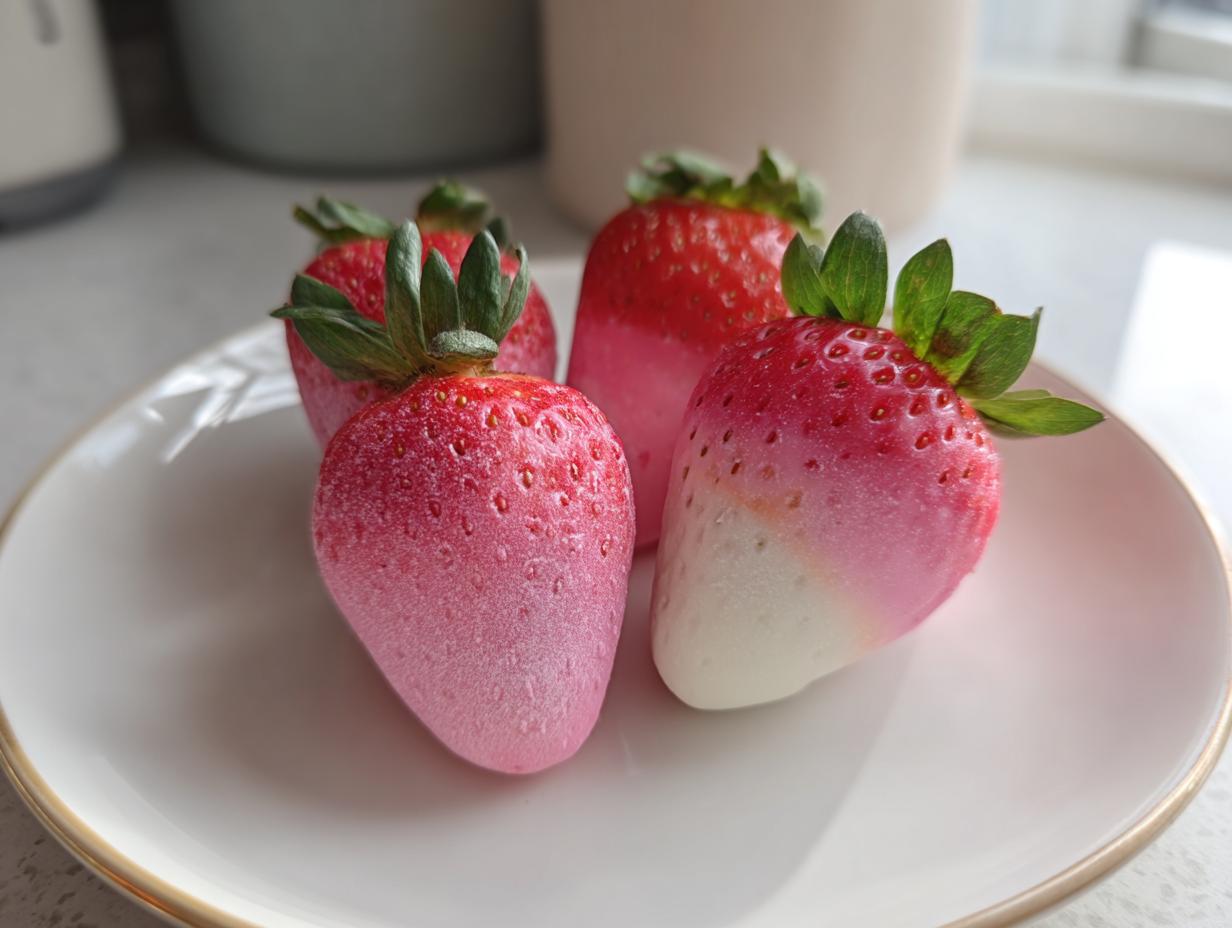
Oh my gosh, have you ever looked at food and just thought, “That’s too beautiful to eat”? Well, that’s exactly how I feel about these Ombre Pink Chocolate Dipped Strawberries! Forget plain white chocolate dipping; we are leveling up to edible art for your next party or romantic surprise. I spent ages trying to figure out how to get smooth, non-streaky chocolate, especially when mixing colors, but trust me, after a few messy attempts, I finally cracked the code for gourmet candy making for beginners.
Seriously, the gradual fade from deep rose to soft blush is easier than it looks. Once you master the layering, you’ll be making these for every single celebration. It takes a little patience between layers, but the result is just stunning!

Why This Recipe for Ombre Pink Chocolate Dipped Strawberries Works (E-E-A-T)
When you’re aiming for professional-looking treats, technique matters way more than just throwing things in a bowl! I’m going to show you exactly why this method cuts through all the usual chocolate dipping frustration. It’s all about managing the chocolate’s temperamental nature.
- We have to use white chocolate as the base. Dark or milk chocolate just won’t take the pink coloring cleanly, and we need that pure canvas for our gradient!
- The fruit absolute must be bone dry. If you skip this? Oops! Your beautiful melted chocolate will instantly seize up into a grainy mess. Don’t skip the pat-down!
- The ombre effect demands precision in coloring and timing. Letting each layer set completely means you get that crisp, clean color separation instead of muddy mixing.
The Secret to Perfectly Smooth Dipped Fruit
This is where amateurs sometimes go wrong. You cannot use standard water-based food coloring in melted chocolate—it just won’t mix. Trust me, if you try it, your chocolate will seize up faster than you can say, “Oh no!” We need that fat-soluble color, which is why the recipe calls for oil-based candy coloring or cocoa butter coloring.
Also, white chocolate can thicken up quickly when you’re working in layers. Keeping a tiny bit of coconut oil or shortening handy helps you thin it just enough so you get that gorgeous, slick coat, giving you perfectly smooth dipped fruit every single time.
Gathering Your Ingredients for Ombre Pink Chocolate Dipped Strawberries
Okay, before we start dipping, we need to get our ducks in a row ingredient-wise. Since we are working with white chocolate, which shows every little mistake—and we want that perfect pink—don’t skimp on quality here! You’ll need about a pound of super fresh berries.
The key player is the white chocolate. I always grab good quality melting wafers because they melt predictably. Then comes the fun part: you absolutely need three shades of pink coloring—deep, medium, and light—to pull off that beautiful fade for your Ombre Pink Chocolate Dipped Strawberries.
Ingredient Spotlight: Coloring White Chocolate for Ombre Pink Chocolate Dipped Strawberries
Remember how I mentioned the seizing risk? It all boils down to fat! White chocolate is mostly fat, and oil and water don’t mix, right? That’s why the coloring has to match the medium. If you try using regular liquid food coloring, which is water-based, it ruins the texture of the cocoa butter in the chocolate and makes it clump!
You must use oil-based colorings or the super concentrated cocoa butter versions for your white chocolate coloring methods. These fat-soluble colors blend right in, keeping everything satin smooth, which is exactly what we need for that glossy finish.
Step-by-Step Instructions: How to Make Ombre Pink Chocolate Dipped Strawberries
Alright, this is the big moment! We’re going from beautifully prepped ingredients to actual edible art. I want you to take a deep breath and remember: patience is the secret ingredient here, especially letting things set between colors. Follow these exact steps if you want those perfect, professional-looking Ombre Pink Chocolate Dipped Strawberries.
Preparation: Drying Strawberries for Optimal Ombre Pink Chocolate Dipped Strawberries Adhesion
Listen to me on this one single point: moisture hates chocolate. You *must* wash your beautiful berries and then dry them until they feel barely damp. I mean it! Use paper towels, gently patting every single one. Don’t even leave them near the sink where steam might be lingering. Also, go ahead and remove those little green leafy parts (the hulls) now so they are ready for dipping. Any water droplet left will cause sad streaks, and we don’t want that tragedy!
Color Melting Chocolate Tutorial for Layered Color Chocolate Strawberries
Next, you need four separate microwave-safe bowls ready to go. Divide your white chocolate evenly among them. Now, we color! Leave one bowl totally white. Add the tiniest speck of color to the second bowl for light pink, more for the medium shade in the third, and really load up the fourth bowl for your deep pink. Melt each bowl separately! Pop them in for 30 seconds at a time, stirring hard between each session until they are perfectly smooth. If things feel too thick, stir in just a tiny drizzle of coconut oil to improve that flow; this is part of the great color melting chocolate tutorial experience!
Dipping Order: Achieving the Ombre Effect with Ombre Pink Chocolate Dipped Strawberries
Ready for the fun stacking? We dip from darkest to lightest! Take your first berry and dip the bottom third only into the deep pink. Lay it on parchment paper and seriously, let it set up—even chilling for 10 minutes helps. Once firm, dip the middle section into the medium pink, making sure you overlap just a little bit onto that first dry layer. Let that set, too!
Repeat this process for the light pink, overlapping slightly above the medium shade. For the grand finale, dip the very tip of the berry into the reserved white chocolate for that final, perfect color transition. This layering is what creates the stunning visual effect in your layered color chocolate strawberries. Once you’ve dipped them all, you let them sit until they are totally firm before moving them. Trust me, fighting the layers before they set is the fastest way to ruin them!
P.S. If you want to try another fun fruity treat once you master this, check out my recipe for Strawberry Shortcake Ice Cream Sandwiches!
Tips for Success with Ombre Pink Chocolate Dipped Strawberries
Okay, we’ve done the mixing, we’ve done the layering, but what happens if things go sideways? Chocolate dipping can sometimes feel like a negotiation, but I’ve learned a few tricks over the years to keep things on track and ensure the chocolate sets up looking glossy and beautiful.
My biggest tip focuses on keeping things cool but not cold. If you rush setting the layers, you get drips and smudges everywhere. If you chill them too hard, condensation starts forming when you pull them out, and that moisture is chocolate’s mortal enemy!
- Wait for the Snap: Before you even *think* about dipping the next layer, the previous layer needs to be completely firm to the touch. For my ombre pink chocolate dipped strawberries, I usually leave them at cool room temperature for about 15–20 minutes between colors, though a quick 5-minute trip to the fridge is okay if your kitchen is warm. This is the secret to how to set chocolate dip evenly without the colors bleeding.
- Don’t Double Dip Excessively: After you dip a strawberry, hold it over the bowl for just a few seconds, letting any excess drip off. Then, gently scrape the bottom edge on the side of the bowl to create a clean break line. This stops those long, annoying chocolate tails from forming.
- Fixing Running Chocolate: If your layers are running a bit too much down the sides, don’t try to wipe them! That just smears the color. Instead, gently tap the baking sheet against the counter once or twice right after dipping. The vibration helps the chocolate settle into a cleaner line.
If you’re looking for another totally addictive, easy-to-make treat that’s great for parties, you have to try my recipe for Salted Caramel Pretzel Bites!
Elegant Dessert Presentation Techniques for Ombre Pink Chocolate Dipped Strawberries
Honestly, these strawberries are showstoppers all on their own, but putting them together for a display? That’s where the magic really happens! You spend all that time perfecting the color melt, so you have to show it off, right? These are perfect for baby showers—hello, girl announcement ideas—or for making an anniversary dessert table feel super luxe.
Learning different ways to plate these beauties is key to mastering those elegant dessert presentation techniques. Don’t just set them on a regular plate; make them work for you!
- The Tiered Approach: If you have a small cake stand, use it! Arrange the strawberries around the edge, pointed side up, maybe even mixing in a few plain green strawberries for contrast before placing a small, simple cake in the center.
- Garnish Power: A light dusting of edible gold glitter right on the white tips makes them instantly look like gourmet food art. You can also use the green hulls you took off earlier; rinse them well and stick them back into the chocolate base near the top for a little pop of fresh green contrast.
- The Chocolate Drizzle Finish: Once your ombre layers are totally set, take a tiny spoon of leftover white chocolate and drizzle it very thinly back and forth across the strawberries. It adds texture and makes them look even more professionally decorated.
Pink Dessert Table Inspiration
If you’re building an entire pink dessert table inspiration spread, these ombre berries tie everything together beautifully. They look incredible next to anything cream-colored or pale pink. Think about having a fondue fountain—even if you only put white chocolate in it—and dipping things like marshmallows or even pretzels to go alongside the strawberries.
They also make fantastic toppers! If you happen to be making cupcakes or even just serving a bowl of vanilla ice cream, sticking one of these beauties right on top instantly elevates it from simple to stunning. You should totally check out my recipe for Burrata Prosciutto Crostini if you need an elegant appetizer to go before the sweets!
Storage & Reheating Instructions for Ombre Pink Chocolate Dipped Strawberries
Now that you’ve made these gorgeous creations, you probably want to know how to keep them perfect! Chocolate-dipped fruit has a very specific shelf life, and you have to treat it gently. The goal here is to keep the chocolate shiny and the berry firm.
The simple truth is, you really shouldn’t try to reheat chocolate-dipped strawberries. They are best enjoyed the day you make them, but if you need to keep them for a couple of days, I have the technique for you.
Here’s the deal: Store them in a single layer on a parchment-lined tray. Don’t pile them up, or the beautiful ombre layers will stick to each other! Cover the tray loosely with plastic wrap—and here’s the crucial part—put them in the refrigerator. The low humidity in the fridge helps keep the chocolate coating nice and crisp for up to 48 hours.
When you pull them out before serving, take them out about 20 minutes ahead of time so they can warm up just slightly. If you serve them ice-cold, you lose some of that fresh strawberry flavor! And please, never microwave them; you’ll end up with a pink puddle. They’re meant to be eaten crisp!
Making Ombre Pink Chocolate Dipped Strawberries for Special Occasions
Honestly, these are perfect for anything that needs a little bit of extra pink luxury! They stop being just a snack and start being a centerpiece when you make them look this good. I usually batch-make these for anniversaries because they feel so much more thoughtful than just buying a box of chocolates.
Of course, they are the ultimate treat for showing someone you care. If you’re scrambling for a last-minute romantic gesture, these Valentine’s Day chocolate strawberries look like you spent all day slaving away when really, the hardest part is just waiting for the layers to set! They’re so pretty sitting next to a glass of something bubbly, like the Pomegranate Margaritas I made last fall—talk about an elegant pairing!
Think about baby showers, bridal brunches, or just a fancy Tuesday night when you deserve a treat. The ombre effect just screams, “This required effort and love!”
Frequently Asked Questions About Ombre Pink Chocolate Dipped Strawberries
You know, when you start messing with chocolate and color, you always end up with a few questions! I get it. It’s a fine line between glossy perfection and a seized mess. Here are the things that usually pop up when folks try making these gorgeous layered treats for the first time.
Can I use regular food coloring for this Ombre Pink Chocolate Dipped Strawberries recipe?
Oh, please, don’t do that to yourself! If you try to use the regular liquid food coloring that comes in those little bottles, your white chocolate will seize up on you faster than you can blink. Those colors are water-based, and water makes chocolate freak out! For this recipe—or really, any recipe involving dipping—you absolutely must stick to oil-based candy colors or cocoa butter colors. If you don’t, you’ll end up with gritty, unusable chocolate clumps instead of the smooth coating you need for your DIY dipped strawberries guide.
What is the best way to store my finished Pink chocolate dessert ideas?
This is a tricky one because strawberries are water-heavy! Store them in a single layer in the fridge, covered loosely so air can still circulate a little bit. Don’t seal them airtight unless you want condensation to form, which makes the chocolate sweat and look awful. They are best eaten within two days. If you’re looking for more great pink chocolate dessert ideas, these are certainly the showiest!
If you’re looking for another show-stopping but slightly easier treat to make, you absolutely have to try my Tahini Swirl Brownies!
Can I use candy melts instead of white chocolate?
Yes, you totally can use candy melts! They are often easier for beginners because they don’t temper, so they set up quickly and hold their color really well. They are perfect for achieving that bright, vibrant color in your ombre layers. Just follow the melting instructions for the brand you buy, and they work great for any gourmet candy making for beginners.
How far in advance can I make these strawberries?
Because they contain fresh fruit, I wouldn’t make these more than two days ahead of time. Day one is perfect; the chocolate is firm, and the berry is juicy. By day three, the moisture from the strawberry starts leeching out, sometimes making the chocolate soft or causing the berry to shrink slightly inside the shell. Make them the day before your event for the best results!
Share Your Ombre Pink Chocolate Dipped Strawberries Creations
Phew! That’s all there is to turning simple strawberries into something truly magical. I really hope you try making these!
Once you’ve nailed that perfect color fade, I’d absolutely love to see them! Drop a comment below and tell me which shade of pink was your favorite to work with. Did you go super light or deep and dramatic? If the recipe was a hit, please give it 5 stars! And if you’re looking for another quick indulgence, you must check out my Chocolate Orange Mug Cake—talk about instant gratification!
Print
Ombre Pink Chocolate Dipped Strawberries
- Total Time: 20 min
- Yield: 1 pound
- Diet: Vegetarian
Description
A guide to making visually appealing strawberries dipped in white chocolate colored with a gradual pink ombre effect.
Ingredients
- 1 pound fresh strawberries, washed and completely dried
- 12 ounces good quality white chocolate melting wafers or finely chopped white chocolate
- 1 teaspoon coconut oil or vegetable shortening (optional, for thinning)
- Pink oil-based candy coloring (or cocoa butter coloring) in three shades: deep pink, medium pink, and light pink
Instructions
- Prepare the strawberries: Remove the green hulls. Pat each strawberry completely dry with paper towels. Moisture prevents the chocolate from adhering properly.
- Divide the white chocolate: Separate the white chocolate into four equal portions in four separate, microwave-safe bowls.
- Color the chocolate: Leave the first portion white. Color the second portion with a tiny amount of light pink coloring. Color the third portion with more coloring for medium pink. Color the fourth portion with the deepest pink coloring.
- Melt the chocolate: Melt each bowl of chocolate separately using 30-second intervals in the microwave, stirring well after each interval until smooth. If the chocolate is too thick, stir in a small amount of coconut oil.
- Dip the first layer (Deep Pink): Dip the bottom third of each strawberry into the deep pink chocolate. Place them on a parchment-lined baking sheet. Let this layer set completely at room temperature or briefly in the refrigerator (about 10 minutes).
- Dip the second layer (Medium Pink): Once the first layer is firm, dip the middle section of the strawberries, overlapping slightly onto the deep pink layer, using the medium pink chocolate. Return to the baking sheet and let set.
- Dip the third layer (Light Pink): Dip the top section of the strawberries, overlapping the medium pink layer, using the light pink chocolate. Let this layer set.
- Dip the final layer (White/Top): Dip the very top portion or tip of the strawberry into the plain white chocolate for the final color transition.
- Set completely: Allow all the chocolate to set fully before serving or storing.
Notes
- Use oil-based or cocoa butter-based coloring only; water-based food coloring will cause the white chocolate to seize and become grainy.
- Ensure strawberries are completely dry; water droplets will ruin the chocolate coating.
- For the smoothest dip, work quickly once the chocolate is melted, as white chocolate sets faster than milk or dark chocolate.
- Prep Time: 20 min
- Cook Time: 0 min
- Category: Dessert
- Method: Dipping
- Cuisine: American
Nutrition
- Serving Size: 1 strawberry
- Calories: 85
- Sugar: 10
- Sodium: 15
- Fat: 5
- Saturated Fat: 3
- Unsaturated Fat: 2
- Trans Fat: 0
- Carbohydrates: 11
- Fiber: 1
- Protein: 1
- Cholesterol: 5

